
26 Practical Bread Shaping Techniques: A Beginner’s Guide
Bread shaping is a crucial step in the bread-making process. Shaping allows dough to be transformed into ideal shapes, enriching the variety of bread types. Below are 20 basic single shaping techniques and 6 continuous shaping techniques, clearly explained and easy to learn.
Basic Single Shaping Techniques
1. Stretching: Hold one end of the dough with one hand, and use the other hand to evenly stretch the dough.
2. Dividing (Gear Knife): Open the gear knife to divide the thin dough into evenly sized small pieces in one go.
3. Dividing (Noodle Cutter): Use a noodle cutter to divide the thick dough into the desired sizes.
4. Dividing (Using a Mold): Cut specific shapes from the dough using a suitable mold for making shaped breads.
5. Rounding (Large Dough): Place the dough on the work surface. Place both hands on the surface, thumbs up and little fingers on the table, and roll the dough into a round shape using your palms.
6. Small Dough Rounding (Using a Hand): Cover a small dough ball with your palm and roll it using the space between your thumb and forefinger to smooth the surface.
7. Rolling (Using a Rolling Pin): Hold the rolling pin with both hands, centering it over the dough, and roll it out thinly with even pressure. Suitable for small areas.
8. Rolling (Using a Puff Pastry Machine): Place the dough on the puff pastry machine and adjust the settings to the desired thickness. Suitable for rolling out large areas evenly.
9. Punching: Press your index finger into the center of the dough to create a hole. Shape the dough into a ring around the hole.
10. Adhesion: Brush the surface of the dough with liquid oil or water, then attach another piece of dough.
11. Pinch: Pinch the opening with your thumb and forefinger to seal the filling inside the dough.
12. Roll: Roll the dough thin, then roll it from one end to the other into a cylindrical shape.
13. Squeeze: When rolling the dough, press the seam with your four fingers together, applying pressure backward to make it adhere more tightly; apply slight pressure at both ends when making an olive shape.
14. Knead: Knead the dough in the same direction with both hands to enhance its elasticity.
15. Pat: Gently pat the dough with your open palms to release excess air.
16. Fold: Fold the rolled-out dough layer by layer to create rich layers inside the bread.
17. Roll: Place your hands in the middle of the dough and roll it outwards and backwards with even pressure to lengthen it.
18. Score: Use a shaping knife to score shallow cuts on the surface of the dough; these will create unique patterns after baking.
19. Transfer
Use tools to transfer the dough, avoiding disrupting the overall shape.
20. Trim
After rolling out, use a knife to trim off excess dough, making the shape more neat and perfect.
Continuous Shaping Techniques
1. Round
- After dividing the dough, fold the four sides inwards.
- Hold the center with one hand, and continue to fold the edges inwards with the other.
- Repeat the folding steps to increase the dough’s firmness.
- Turn the dough over.
- Hold the dough halfway with both hands, squeezing the protruding parts inwards to make the shape more regular.
2. Olive Shape
- Flatten the dough, fold both sides towards the center, and press the seam.
- With the seam facing you, place your hands on both sides in front of the dough.
- Roll up from top to bottom, gathering the dough from both sides towards the center as you roll.
- After rolling, place the seam side down and let it rise.
3. Long Bag Shape
- Flatten the dough to release air.
- Fold the top towards the center and press to seal with the heel of your palm.
- Continue rolling, repeating the pressing step as needed.
- Roll to the desired length and place on a proofing cloth to rest.
4. Oval Shape
- Take a small, round dough ball.
- Flatten it with your palm.
- Fold the left and right sides slightly towards the center, rounding the front end.
- Roll from the front towards the center, pressing the seam with the heel of your palm.
- Roll to the end and smooth out any unevenness at both ends.
- Let rest with the seam facing down.
5. Triangle Shape
- Round a small dough ball and let it rest at room temperature for 20 minutes.
- Gently pat the dough to release internal gas.
- Pinch the dough together with both hands to form a triangle.
- Pinch the seam closed and let it rest with the seam facing down.
6. One-Strand Braid
- Roll the dough to approximately 38 cm long and 1 cm thick.
- Place the strip vertically, pinch the near end and lift about two-thirds of the way up, then bend and press it onto the dough.
- Pass the far end through the arc and place it to the right of the arc.
- Twist the bottom arc into a figure-eight shape.
- Pass one end of the right-side dough through the figure-eight and press to secure.
- Place right side up and let it rest to rise.
This ultrasonic toast cutting and packaging machine integrates ultrasonic cutting and automatic packaging technologies, specifically designed for mass production of toast, achieving integrated cutting and packaging.
The equipment uses an ultrasonic generator to produce 20–40kHz high-frequency vibrations, which, through a titanium alloy blade, achieve “pressureless cutting” without compressing the bread’s structure. The cut surface is smooth and delicate, without crumbs or sticking, with a loss rate of ≤0.5%, far lower than traditional cutting methods. The all-stainless steel body meets food hygiene standards and supports UV sterilization.
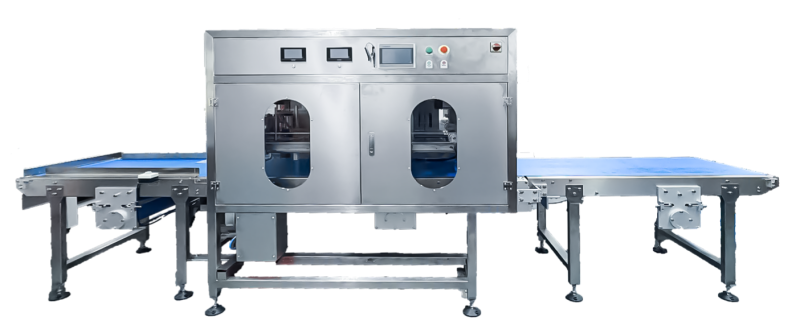
The intelligent PLC control system features a touchscreen operation, can store multiple recipes, and allows for quick switching of slice thickness and specifications. It is suitable for room temperature, refrigerated, and frozen toast, as well as white toast, whole wheat toast, and sandwich toast. It automatically completes feeding, cutting, sealing, and packaging, with a production capacity of 1800–3600 slices/hour, significantly reducing costs and increasing efficiency.
About Cheersonic
Cheersonic manufactures the leading portioning equipment for bakeries producing fresh and frozen desserts. Since 1998 bakers have used Cheersonic machines to cut, slice and portion cheesecake, pie, layer cake, loaves, butter, cheese, pizza, sandwichs, and more. Cheersonic offers ultrasonic cutting solutions that support start-up bakeries and high production commercial facilities alike. Small standalone machines can be used in manual baking facilities and large inline robotic solutions aid in high speed production.
Cheersonic offers many ultrasonic slicing models, both inline and offline applications, with production speeds of 80 to 1,500 cakes or pies per hour.
Cheersonic’ latest offline introductions include ultrasonic cutting with or without divider inserts between each slice. This improves the quality of the cut and makes for a much better product presentation for the customer. In addition, robotic arm improves the speed, efficiency, and accuracy of the cutting process, producing professional looking products every time.